Managers can create, edit, and assign worker-specific schedules to workers using the Assign Work Schedule task. The options available depend on your organization's configuration and business process security policies.
ASSIGN A WORK SCHEDULE
To assign a work schedule:
- Search for and select the Assign Work Schedule task.
- Select the Worker and Start Date for the schedule assignment.
- Optionally, select an End Date.
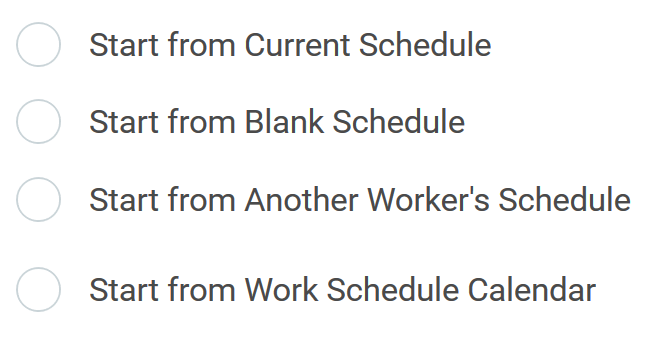
- Choose if you want to start from an existing schedule or from a blank schedule.
- Click OK to proceed.
- In the Schedule Patterns grid, you can use the Add Row and Subtract Row buttons to add or delete weeks from the schedule pattern.
| Example: If you wanted to give a worker Friday off every other week, you would create a second row on the grid and enter no hours for Friday. The work schedule will alternate between the two schedule rows. |
- In the Order column, use the arrows to move rows up and down within the grid.
- To define shift start and end times, click the Pattern Details button on the right side of the row.
![]()
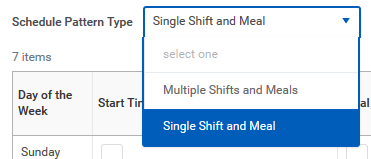
- Before you begin defining pattern details, you will need to select a Schedule Pattern Type.
- If you are defining a simple schedule with only one meal, the default selection of Single Shift and Meal is appropriate.
- If you need to define multiple shifts or multiple meals, select Multiple Shifts and Meals.
Define the start and end times for shifts and meals each day, or indicate a 24-hour shift by selecting the 24-Hour Shift checkbox.

Note: If you selected a Pattern Type of Multiple Shifts and Meals, you can use the Add Row buttons to add additional start and end times per day for shifts and meals.
- When you are satisfied with your selections, click Done and then OK to save the schedule.
View the Schedule for a Worker
To confirm the schedule has been assigned correctly, you can use the View Schedule for Worker task.
- Search for and select the View Schedule for Worker task.
- Select the Worker and Date.
- Click OK to proceed.
- Verify that the worker's schedule displays correctly on the calendar.
View the Schedule History for a Worker
You can use the Schedule History for Worker task to view the history of schedule assignment events.
- Search for and select the Schedule History for Worker task.
- Select the Worker.
- Click OK to proceed.
- Review the schedule events in the grid. To see event details, click an event's Related Actions.