Table of Contents
Purpose
The purpose of the eFax user guide is to instruct users on how to send and receive faxes while using the Faxpipe eFax service.
eFax Service Overview
Our organization offers an efficient eFax service that eliminates the need for physical fax machines. With our eFax Service, individuals can securely send and receive faxes through our HIPAA-compliant system. Transmissions are seamlessly integrated with the university's email system, ensuring convenience and accessibility for all users. All fax transmissions are retained for up to 90 days to maintain compliance and data integrity. This service allows the transmission of the most common file types of documents to fax:
- .doc and .docx (Microsoft Word Documents)
- .tif and .tiff (Tagged Image File)
- .txt and .text (Plain text)
- .prn and .ps (PostScript)
- .pdf (Adobe PDF)
- .html and .htm (HTML Document)
- .rtf (Rich Text Format)
- .jpg and .jpeg
- .xls and .xlsx (Microsoft Excel Document)
- .fdx (Winfax)
- .snp
- .odt - OpenOffice Document
- .wpd - Word Perfect Document
* The above file types are accepted, but their formats may not appear as in the original document.
Sending Faxes
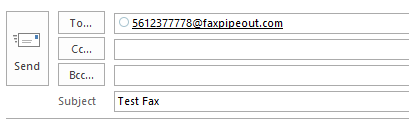
To send a fax using your email account, please Open Microsoft Outlook and click the New Email button. Your email should be constructed as follows:
| Outlook Section | Instructions | Example |
|---|---|---|
| To: | The recipient fax should be in the TO section as fax_number@faxpipeout.commber@faxpipeout.com for the person you are faxing. If your fax number is (561)237-7778, then look at the example section for an example of your send-to-email. | 5615377778@faxpipeout.com |
| Subject: | The subject line can be anything you want it to be. It is for your record. | Test Fax |
| Body: | Recipient's fax numbers The first line of the email body should include the fax number you would like to fax. If you are sending to multiple fax numbers, then each line would consist of the other fax numbers. Please follow the example of how the recipient's fax number should be written. Note: There are no dashes or brackets. | 5615377779 5615377780 5615377782 |
| Body: | Cover Page Please note that Faxpipe does not automatically add cover pages to outbound faxes. One of the following tags should be used to create a cover page:
You must use the tag <coverpage> to create a cover page. Everything after this tag will be included in the fax as its cover page. | <Coverpage> Fax From: (561)537-7781 ATTN: Anna Smith From: John Brown Date: 11/7/23 #of Pages: 6 |
| Attachment: | Attach the documents you wish to send in the order you would like them received. | Attachments based on the supported file time. |
Fax Sample
In the email sample below, John Brown will send six fax pages from his (561)537-7781 fax number to Anna Smith's (561)537-7778.
| To: |
|
| Subject: | |
| Body: | 5615377778 <Coverpage> Fax From: (561)537-7781 ATTN: Anna Smith From: John Brown Subject: Test Fax |
| Attachment: | Attach the documents you wish to send in the order you would like them received. |
Receiving and eFax Transmission
Fax transmitted to your department's fax number is delivered securely to your university designated fax mailbox that is shared with members of your department. The incoming fax is sent from the @faxpipe.com domain. Incoming messages will not be marked with the "External" warning tag. The full body of the fax transmission will be included in the message as an attachment in PDF format. There is no limit to the number of incoming pages you can receive.
Setting up a Fax Mailbox for Your Account
Microsoft Outlook for Windows
Your department's shared fax mailbox is automatically added to your view. Please create an IT Ticket for assistance if the shared mailbox is not automatically added to your Outlook account.
Microsoft Outlook for MacOS
For Outlook for Mac users, your department fax mailbox must be manually added using the following steps:
Launch the Outlook application from the Application folder on your Mac.
Click Preferences in the Outlook menu at the top left of the screen. Then...
Add Shared Mailbox:
- Click on the Delegation and Sharing button under your account information.
- Click on the Shared with Me tab at the top.
- Click the + sign at the bottom-left corner.
- Enter the shared email address or department fax mailbox and click Add.
- If you have the necessary permissions, the shared mailbox will now be added to your account list. Please create an IT ticket if you don't have permission.
- The new mailbox will appear in the Shared with Me window.
- Click Done to finish adding the mailbox.
Microsoft Outlook for iOS
Use the following steps to access a shared mailbox on a mobile device.
- Launch the Outlook app on your mobile device
- Sign into your primary account in Outlook for iOS
- Click on your profile picture at the top-left corner, next to the Inbox.
- Click on the Settings icon at the bottom-right corner.
- Tap the Add Mail Account button under your primary Office 365 account, then tap Add Shared Mailbox.
- Enter the shared email address or department fax mailbox and click Add Shared Mailbox.
View Inbound Fax
To view inbound faxes, you must have completed the previous section, Setting up a Fax Mailbox for Your Account.
Microsoft Outlook for Windows
To access and view a fax mailbox in Microsoft Outlook for Windows, you need to:
- Launch Outlook for Windows if it is not already open
- Click on your department's fax mailbox name in the folder pane to expand and view its contents.
- Click on the inbox and locate the fax you are expecting.
Microsoft Outlook for MacOS
To access and view a fax mailbox in Microsoft Outlook for MacOS, you need to:
- Launch Outlook for MacOS if it is not already open
- Look in the navigation pane on the left side of the Outlook window
- Click on your department's fax mailbox name to expand and view its contents.
- Click on the inbox, and look for the fax you are expecting.
Microsoft Outlook for iOS
To access and view a fax mailbox in Microsoft Outlook for iOS, you need to:
- Launch Outlook for iOS if it is not already open
- Click on the profile picture next to the Inbox
- Select your department's fax mailbox profile
- Look for the fax you are expecting.