This job aid does not cover expenses paid with the Lynn JP Card. For JP Card transactions please refer to job Aid XXXXXXX
Say Goodbye to the Travel Expense and Expenditure request forms!
The Expenses module in Workday makes creating, approving, and monitoring expenses and spend authorizations at Lynn University a more streamlined process. With Workday, employees can attach receipts directly into the system for expense reports. Receipts in Workday can be uploaded via the mobile app. Employees can also see where in the process a spend authorization or expense report is.
Concepts:
| Process | Workday | Before Workday |
|---|---|---|
| Expense Report | Expense reports are submitted so that you are reimbursed for institution related costs, such as airfare or hotel expenses. | Travel Expense Form Expenditure Request Form |
| Spend Authorization | A spend authorization is a preapproval of your travel and its related expenses that must be submitted and processed in Workday prior to making arrangements for your travel. | Expenditure Request Form Faculty travel authorizations and cash advances. |
On this Job Aid:
View an Existing Expense Report
Create a Spend Authorization Request
Mobile - Enter Expense and Submit Expense Report
Create an Expense Report
From the Search bar you can type "cre expe" and select taks Create Expense Report or
- Click the Create Expense Report button under Actions.

- Select either Create Expense Report . Your selection determines what information displays on the new expense report.

Select Create a New Expense Report. You can also copy previous expense reports and modify specific items. Complete all required fields, including Date, Expense Item, Quantity, Per Unit Amount, Total Amount, and Business Topics, if applicable.

If you added items previously to process later on your mobile device, a list of those items will display under Quick Expense.

- Click OK.
A window will open to add the expense items.
Click plus sign to add an expense. NOTE: Quick expense are those entered in Workday (via mobile or browser) but not added to any expense report.

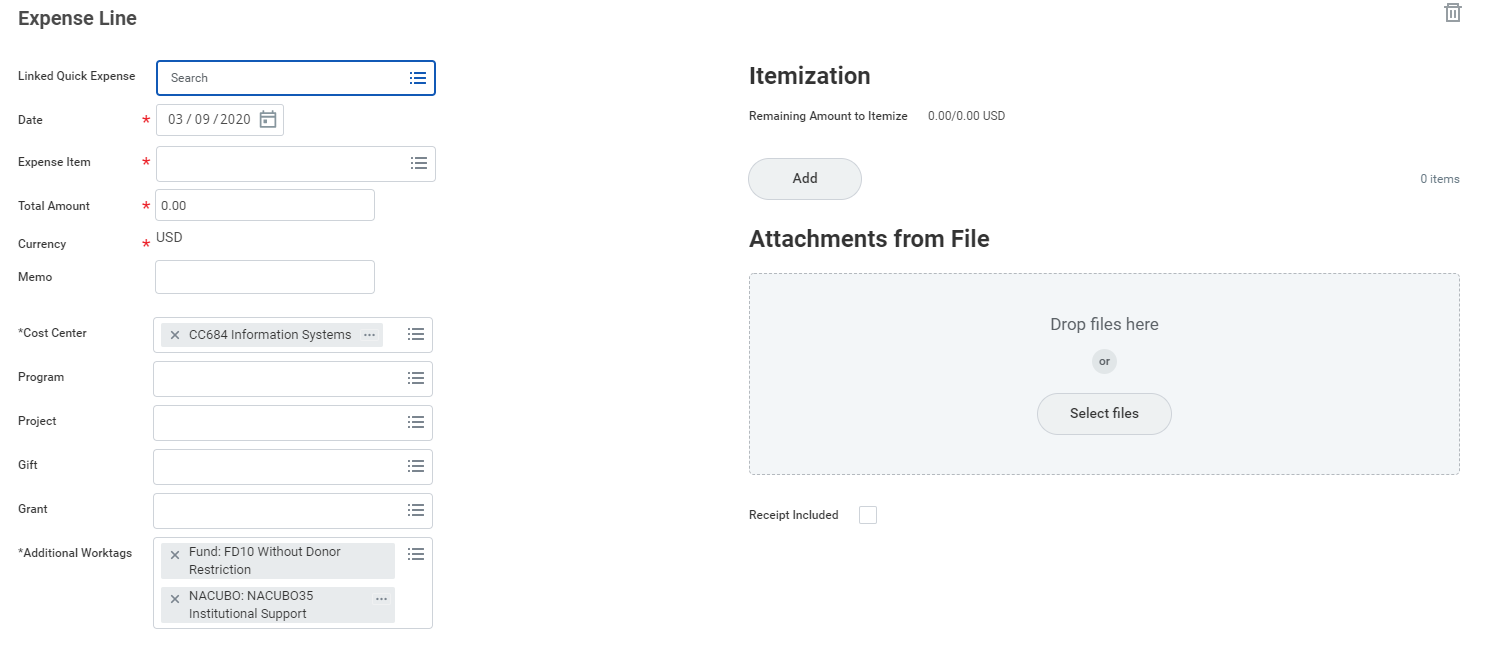
Fill in the expense line. Items with red asterisk are required. Drag and drop or click select to add your receipts into Attachment from file area.
- Repeat items 7 and 8 until you added all your expense items.
- If you need to delete and item from the expense report, click the delete icon

- Once you add all items, click Submit.
Add Worktags
Workday use "worktags to organize information. Worktags are keywords that provide reporting dimensions or metadata for your expense reports. Expenses can also be charged to a specific project, program or gift a worktag that can be assigned on creation. These worktags will also route the expense to the project, program or giftmanager for approval.

- Cost Center: Workday may auto-populate this field; it should only be modified as needed.
Additional Worktags: Users in Professional Services-related cost centers may be required to associate an expense report with a project worktag (even if you are not charging expenses to customer-billable projects).Fund and Nacubo worktags should not be deleted. They are for Financial reports use.
Itemize Your Expenses
Sometimes you may need to itemize an expense to exclude items or charge items to another cost center. For example, your hotel bill may include your room rate, room service, internet fees, and more.
From the Expense Lines tab within an expense report:
- Click the Add button under Itemization.

- Fields display based on expense type. Enter the necessary information, based on the expense type you are itemizing. Your itemized expenses must equal the total of your Expense Report Line.
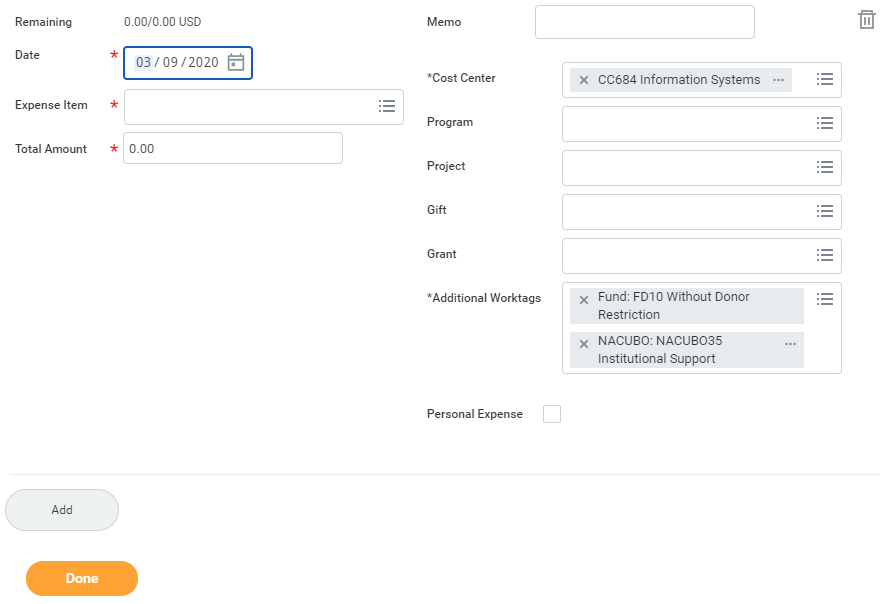
- Click Done.
View an Existing Expense Report
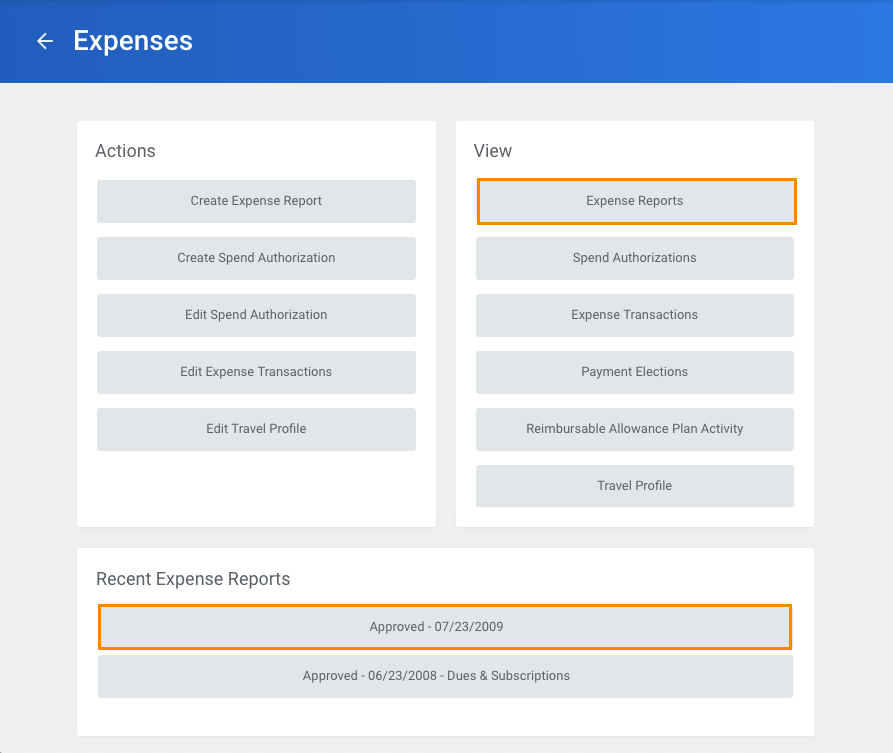
From the Expenses application:
- Click the Expense Reports button under View. You have the option of filtering expense reports by status or date.
- You could also click the date of the expense report you want to view in the Recent Expense Reports section.
Create a Spend Authorization Request
Spend authorizations are used to grant permission for future expenses. Workers initiate these authorizations. Managers approve or take other actions on them.
From the Expenses application:
From the Search bar you can type "cre spend" and select taks Create Spend Authorization or
- Click the Create Spend Authorization button under Actions.
- Complete the required fields, including Company, Start Date, End Date, Description, Spend Authorization Total, and Reimbursement Payment Type.
- In the Justification field, you can clarify the reason for the future expense.
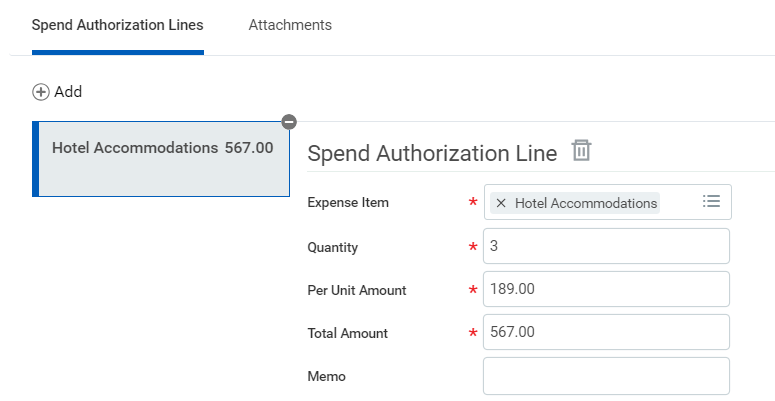
- Click the Add Row icon
 to add spend authorization line item details.
 - Complete all required fields for each spend authorization line, adding additional lines as needed. Attachments such as hotel and airfare itineraries can be submitted as part of the spend authorization request.
- Click the Attachments tab.
- Drag and drop files from your desktop, or click the Select files button to upload one or more files.
- Click Submit.
View an Existing Spend Authorization
From the Expenses application:
- Click the Spend Authorizations button under View.
- Click Change Spend Authorization to modify an existing spend authorization.
![]()
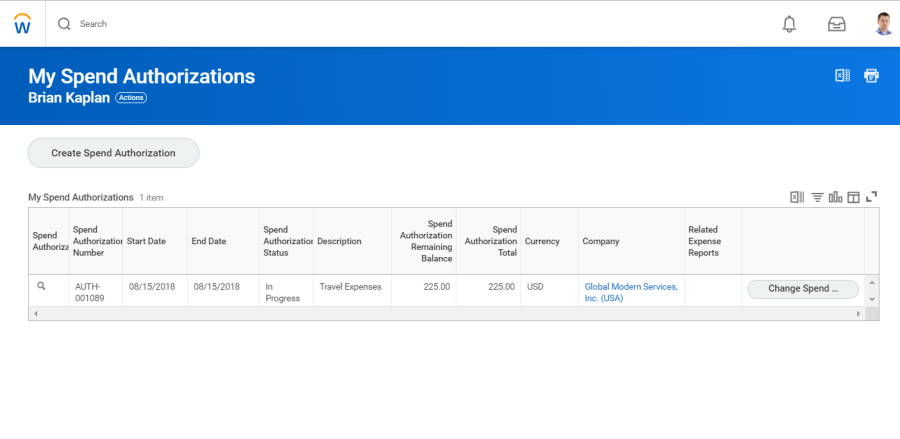
- Click the Magnifying Glass icon to view authorization details.
- Click the Process History tab to check the status of the spend authorization request.
You can also start a new spend authorization from the My Spend Authorizations page:
- Click the Create Spend Authorization button to create a new spend authorization. Enter spend authorization details.
- Click Submit, then Done.
Mobile
Enter Expense and Submit Expense Report
iPhone
Use the Expenses app to track expenses, upload receipts, and submit expense reports.
From the Home screen:
- Tap View Apps > Expenses.
- Tap Scan Receipt to scan your receipt and have Workday automatically add expense data, or tap Enter Quick Expense to fill in the expense information manually as described in the following steps. For an iPhone, you can also choose an existing photo or import an attachment. For an Android, you can select an existing photo from the gallery. If you took a photo, tap the camera icon and select Choose Photo or Import Attachment.
- Tap Enter Quick Expense.
- Enter a Date.
- Add any other supporting information.
- Tap Done.
Repeat previous steps to add any other expense items you want to report. When all expense items are added, you can submit an expense report from the Expenses app:
- Tap Create Expense Report.
- Include required information, such as Company, Expense Report Date, Cost Center, and Region.
- Tap the Additional Worktags prompt. Add information your organization may require, like Location and Project.
- To add a Project, tap Project from the Additional Worktags prompt.
Select your Project, then tap Done.
- Once you've completed the expense report information, tap Done.
- Tap New Expense to begin attaching expenses to the report.
- Tap Existing Expenses. You can also choose to add new expenses in this step by tapping New Expense.
- Choose the pre-existing expenses you want to include in the report by tapping the checkmark next to each expense item you saved.
- Tap Next.
- Tap Review.
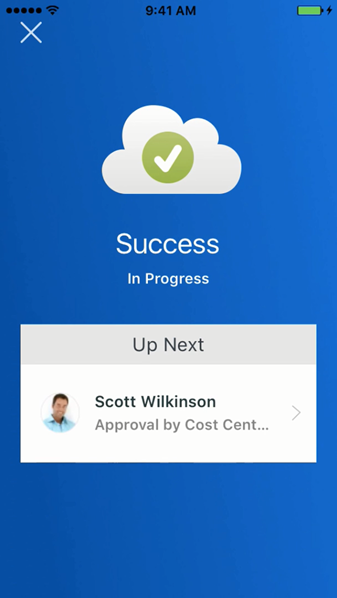
Review your expense items for accuracy, correct any errors, and then tap Submit. A confirmation screen shows your expense report has been routed for approval.
iPad
Use the Expenses app to track expenses, upload receipts, and submit expense reports.
From the Home screen:- Tap View Apps > Expenses.
- From here, you can tap Scan Receipt to scan your receipt and have Workday automatically add expense data, or tap Enter Quick Expense to fill in expense information manually. You can also tap Create Expense Report to start a new expense report.
- Tap Enter Quick Expense to enter the expense manually.
- Tap the Paperclip icon to choose a photo or import an attachment.
- Enter a Date (this may have auto-filled when creating the expense).
- Add the Expense Item, along with any other supporting information for the expense.
- Tap Done, then Save (the newly entered expense should save automatically).
Tap the back arrow in the upper left to add any other expense items you want to report. When all expense items are added, you can submit an expense report from the Expenses application:
- Tap Available Expenses from the Expenses application.
- Tap the checkmark icon to add the expense item to an Expense Report.
- Tap the Add to Report button, then Create New Report.
- Include required information such as, Company, Expense Report, Date, Cost Center, and Region.
- Optionally, tap the Additional Worktags prompt. Add information your organization may require, like Location and Project.
To add a Project, tap Project from the Additional Worktags prompt, then select your Project.
- Tap Done.
- Tap Review.
Review your expense items for accuracy and correct any errors, then tap Submit. A confirmation screen shows your expense report has been routed for approval.
