Onboarding with Workday Student
Use this guide to complete your Workday Student Go Live onboarding tasks! Refer to the Workday Tools and Navigation job aid for more information about navigating Workday.
The Go Live onboarding is a series of essential tasks you need to complete to prepare for Workday Student. The onboarding process in Workday is sequential and tasks will be delivered to your Workday task inbox and Lynn email. Complete a task to move on to the next item.
- You will receive notifications via email to your Lynn email address to complete the onboarding items
- Complete each task listed. Tasks may be presented in a different order than listed below.
- Each completion of an onboarding task will automatically remove the task from the Action column.
- Read all the information/instructions/documents on each task screen.
- Do not enter comments in the items comment fields as they are not monitored.
- Contact Workday@lynn.edu for any issues with your onboarding tasks
On this Job aid:
Email Notifications
Once Admissions process your application and your Lynn account is created, you will receive notifications from lynn@workday.com to complete your onboarding tasks.
Sign-in to Workday to complete your onboarding.

Sign-in to Workday
Log in to Workday. From your home page you can navigate to the following:
- Your inbox tasks
- Awaiting Your Action

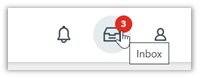
To begin your onboarding tasks:
- Click the box in the center of the screen with the title Awaiting Your Action
- Or Click the Inbox icon in the top right corner of the screen
Need help?
- Click here for instructions on how to log into Workday
- Click here for details on Workday's landing page
- Click here for details on Workday's tools and navigation
- Click here for details on Workday's My Tasks and Notifications
Onboarding Tasks
Manage my Privacy

- Read through the recommendations and select a privacy setting.
- Scroll down below the privacy setting options for additional information and options. You can check items here to enable additional items to be visible on your profile.
- The items already checked are visible by default. Click Submit, then Done.

Review My Personal Information

- Click on the Review My Personal Information task.

- Review the information available. If you need to make changes, click the Edit button.
- To make edits navigate to the information you want up update click on the pencil icon to unlock the section.

- Update the information and then click the check mark icon to save your changes.

- Once you have made edits, or if you don't need to make edits, click Approve.
Review My Home Contact Information

- Review your contact information.
- To make changes click the Edit button

- Select pencil icon next to a record to modify or Select X to delete a record
- Select add button to add a new record

- Click Approve to complete task or if your contact information is correct
Address Usage: You must include the appropriate address usage on your home contact information.
DO NOT OVERRIDE YOUR LEGAL HOME ADDRESS with your Person Local Address. Instead, click the "Add" button, input your Florida address, add the usage as "Personal Local Address," and ensure that you select the "Primary" checkbox.
- Legal Home Permanent: This usage should reflect your home address when you are not attending school. If you reside with your family during non-school periods, kindly input your family's home address in this section.
- Personal Local Address: This usage pertains to the address where you currently reside for the ongoing semester. If this address differs from your Legal Home Address, or if you reside on campus, it is necessary to maintain a separate contact entry. Avoid overwriting your legal home address. Instead, click the "Add" button, input your Florida address, add the usage as "Local," and ensure that you select the "Primary" checkbox.
- Note: If you are a commuter and reside in Florida and your legal home permanent and local addresses are be the same, please add both usage labels to your primary contact record.

Phone Type: Select Mobile Opt-In Texting under Phone Device to receive Lynn alert emergency text messages.

Review Preferred Name

- Click Change My Preferred Name
- Uncheck Use Legal Name as Preferred Name
- Change First Name
- Click Submit

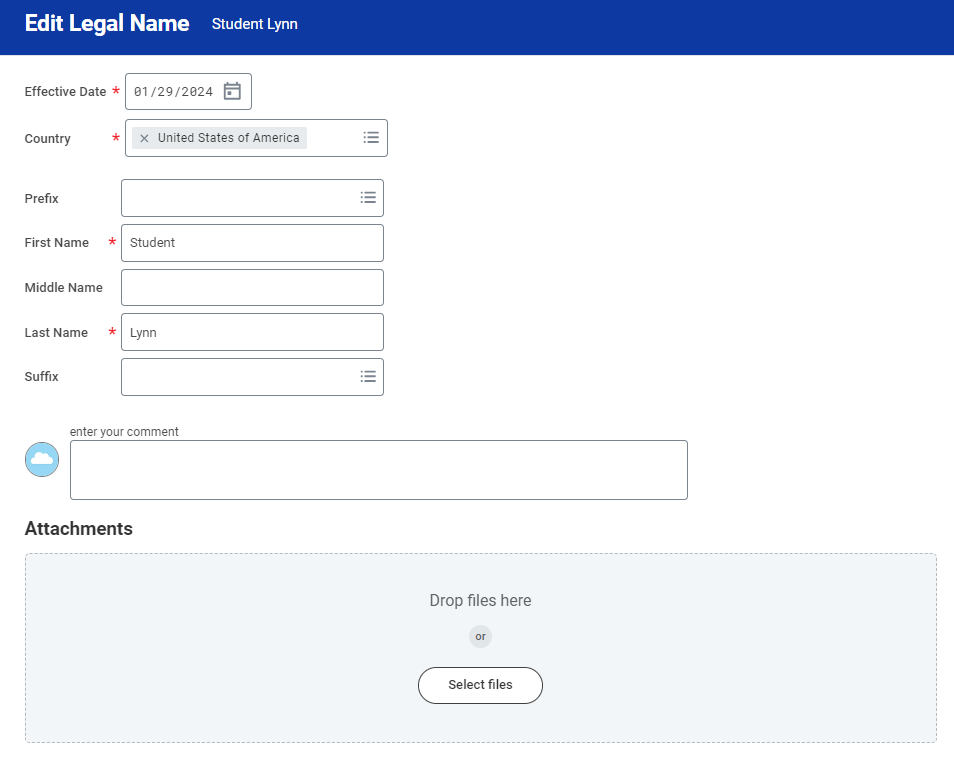
Review Legal Name

- If the legal name displayed is correct click "Approve" otherwise use the "Edit" box below and make the appropriate changes.
- Drag and drop your documentation or select a file from your computer
- Select document category "Legal Name Change"
- Click Submit
ACH Refund Setup

- Select Payment Elections
If you are a student worker, you may already have Payment Elections in Workday. Review your Accounts and make any necessary changes. - Click submit

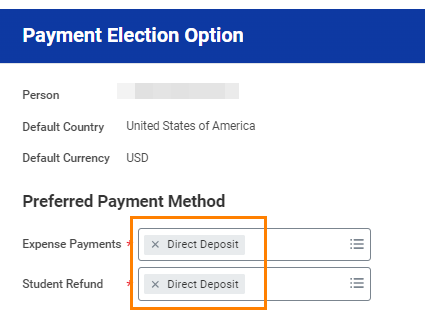
If you do not have a payment election, a payment election option screen will appear.
- Select "Direct Deposit" for Expense Payments and Student Refunds
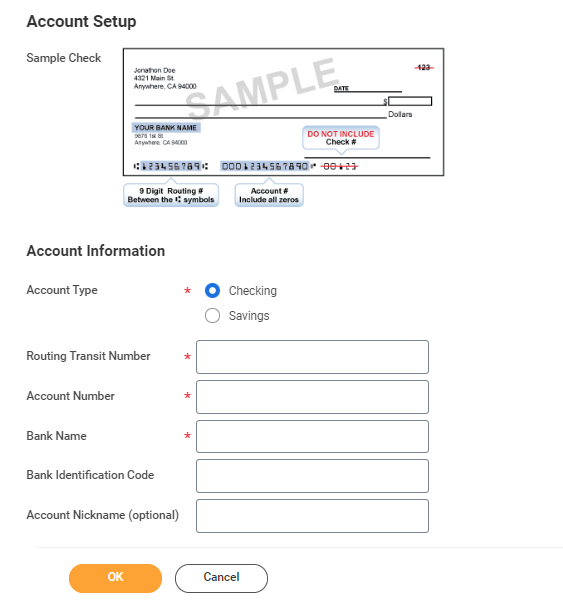
- Enter Bank account information and select OK
- Routing Numbers is a required field and should be 9 digits in length
- Bank name is required field
- Account Type is a required field
- Account Number is a required field.
Review Friends and Family

Need help?
- Click here for information on third party proxy (log in and navigation)
- Click here for detailed instructions on Friends and Family and Third-Party permissions
- Click the Add button to add an individual. You will be required to add at least one method of communication for each person listed.
- Click on the Review My Friends and Family task. Read through the instructions.
- Click the Add button.
- Select Relationship Type (you must select an Emergency Contact relationship type before any other types can be selected and before you can complete this task.)
- Click the box next to Is Third-Party User if you want this contact to be a third-party user and have their own Workday access to make payments or view account/academic information.

- In the Name section, add the contact's first name, last name.

- In the Contact Information tab, click Add to submit at least one method of contact.
For Emergency Contacts, you must enter an address and a phone number. Under phone, select device type mobile opt-in or mobile opt-out to include or exclude them of Lynn's emergency notifications
For Third Party Users you must enter an email address.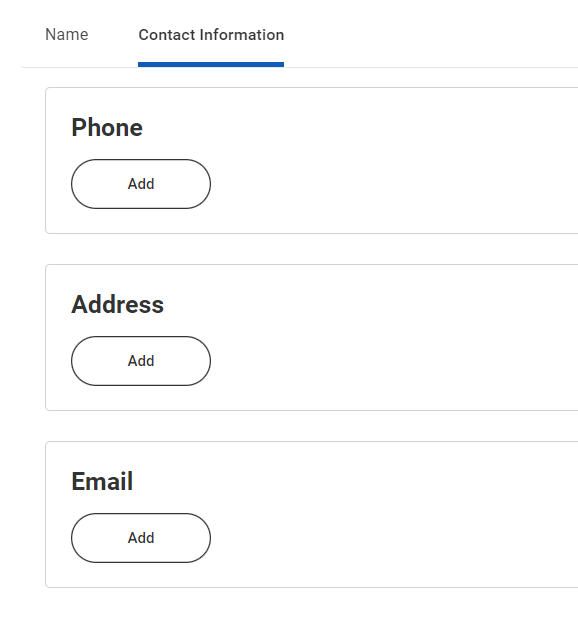
- Click OK, and then click Done.
- Return to the Review my Friends and Family task.
- Click Submit. Click Done.
You must add at least one emergency contact to your records otherwise you will get an error when you click Submit

My Friends and Family Permissions

To provide third-party access to your records you must first select contact as third party user, then manage permissions for user.
- On the third-party record, scroll to the right and select Actions button.

- Select Edit Friends and Family

- Select Is Third Party User (specific permissions will be granted in the next steps). Click OK.

- On the contact record, scroll to the right. Select Action button. Select Manage Permissions for My Third Party

- Verify third-party name, click OK

- Select the permissions for the third-party user by clicking the checkbox next to the permission. You may grant the following permissions:
- Make a Payment
- View Financial Aid Package
- View Account Activity
- View Student Statement
- View Current Classes
- View Student Grades
- Generate Unofficial Transcript

- In the FERPA Waiver pop-up, write in the purpose of the waiver, and click Confirm.
