 Welcome to Lynn! Verbiage TBD by employee services
Table of Contents

Step 1: Complete onboarding network account steps
Overview
Onboarding your network account means the following:
- Set the following password recovery options:
- Set 3 security password recovery questions as a password recovery option
- Set/Confirm your personal email address as a password recovery option
- Set/Confirm your mobile number as a password recovery option
- Set your password
- Enable your account
Complete the steps below to onboard your network account
- Find the Onboarding email (see image below).
- This should have been communicated to your personal email address from your hiring manager.
- Check your spam or junk folders just in case you don't see it in your main inbox
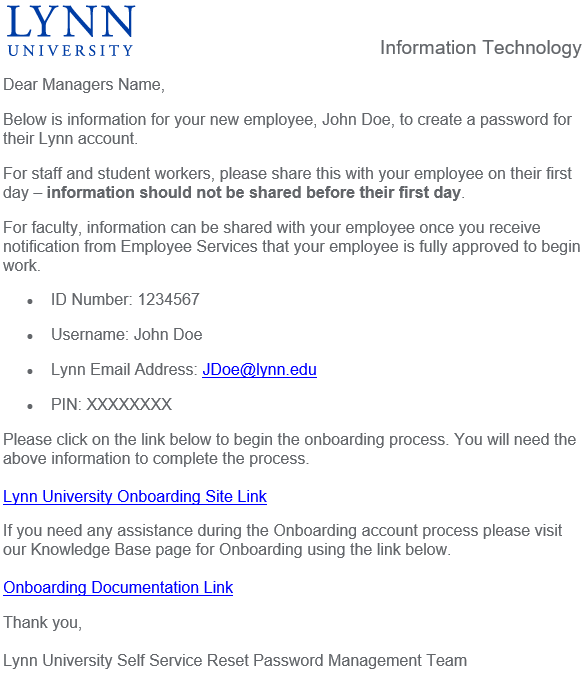
- Complete the steps to onboard your network account
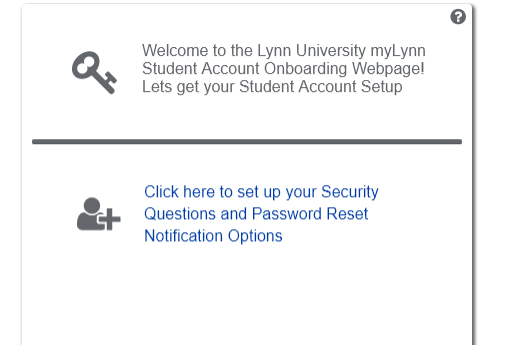
- Follow the instructions in the email by clicking on the Lynn University Onboarding Site Link or you can open up any browser and enter https://onboarding.lynn.edu.
- Please keep the Onboarding email or information ready, as you will need it for the steps below.
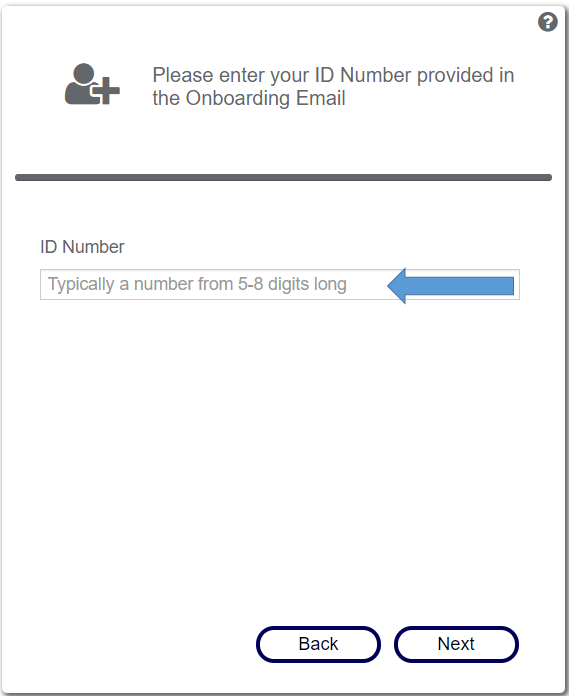
- Enter your ID number from the email. It is typically a number from 5 - 8 digits long. Then click ‘Next’
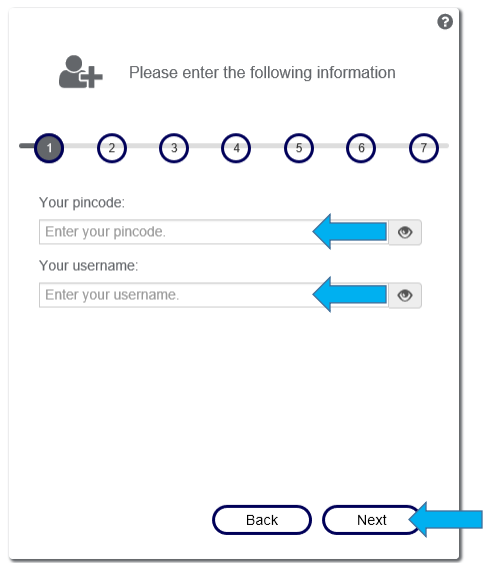
- Here you will need to enter the pin code and username provided in the email. Then click ‘Next’
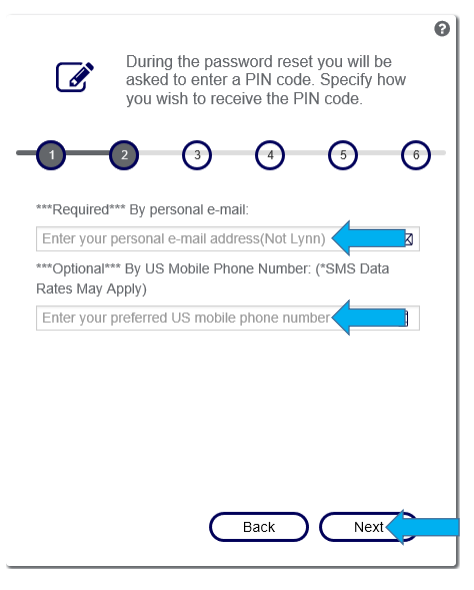
- This page requires you to enter a required personal email address and an optional mobile phone number in the US. This information will be stored in our automated password reset system. Then click ‘Next
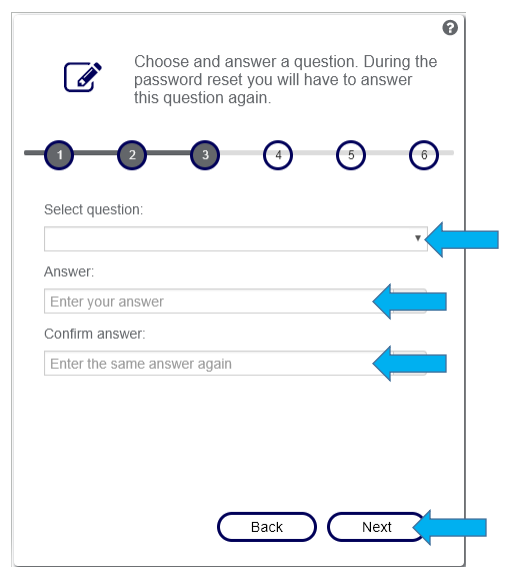
- The next two pages will look very similar and require you to select security questions and provide answers. This information will be stored in our self-service reset password management system (SSRPM) should you need to reset your password in the future. Click ‘Next’ when you have filled out both pages.
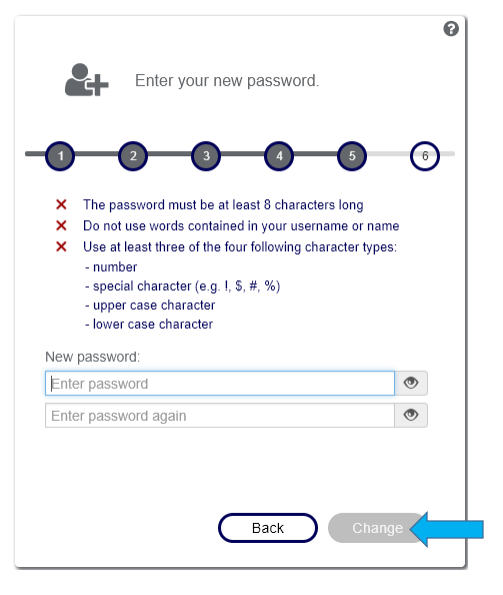
- This next page allows you to set your account password for the first time. Please make sure to follow the password requirements listed on this page. All of the red X’s must be green check marks for you to be able to successfully set your password. Then click ‘Change’
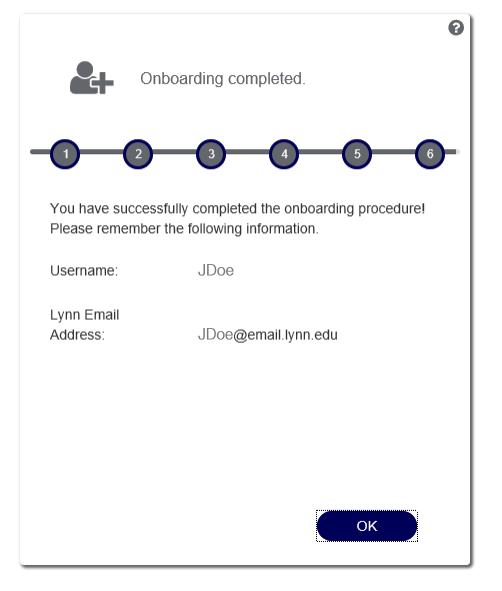
- At this point, you have now successfully Activated your network account and finished the Onboarding process. Please remember both your Username and your Lynn Email Address, as these are what you will use to access the myLynn portal and other online resources. If you click ‘OK’ you will be taken back to the home page for Onboarding. You can close this browser window.
Return to Top
Step 2: Register two separate devices for two-factor authentication with DUO
Overview
Now that you have completed Step 1: Complete onboarding network account steps, there is one more step that you need to do before you can access your email. In an effort to protect your email and the university's data we have implemented two-factor authentication and require it for all employees who are accessing their Lynn email from off-campus. Two-factor authentication is an extra layer of security designed to ensure that you're the only person who can access your account, even if someone else knows your password.
Before you complete this step, read below:
- Please wait a full 24 hours from the time that your manager received the onboarding email from Employee Services before you attempt the following steps.
Complete the steps below register, at a minimum, three separate methods for two-factor authentication
This is one of the most important steps. If you don't complete this step you'll not be able to access email, remotely. We recommend you register a minimum of three methods in DUO. Duo Push, Cell SMS, and Desk Line. If you register only one method, for example, the DUO Push app on your cell phone or your cell phone number for SMS, you will be locked out of your account. If you lose or replace your cell phone, the only way to regain access to your account is to contact IT Support Services.
Click the link below for more instructions on how to register in DUO.
Return to Top
Step 3: Important information regarding accessing the resources below
Now that you have completed steps 1 and 2 above, there is some important information that you need to know regarding accessing the resources below soon after the above steps are completed. See below.
Canvas - Important Information!
Please wait a full 24 hours from the time that your manager received the onboarding email before you try and log in to canvas with your email address.
- Adjuncts and faculty will be able to log into Canvas once they complete Step 1: Complete onboarding network account steps.
- However, adjuncts and faculty will NOT be assigned any courses in Canvas until Academic Affairs completes their steps. Typically Academic Affairs assigns the courses within two weeks of the course start date.
- If you are an adjunct or a faculty member and you do not see the courses you expect in Canvas and it is two weeks or less before your class start date, please contact Academic Affairs.
Click the link below for more instructions on how to access Canvas
MyLynn - Important Information!
- Please wait a full 24 hours from the time that your manager received the onboarding email before you try and log in to myLynn with your network account email address and password.
- Your manager will receive the onboarding email directly from Employee Services.
- If your manager has not received an onboarding email before your start date, your manager should contact Employee Services.
Click Here for more instructions on how to access myLynn
Workday - Important Information!
How to log into workday as a pre-employee (before your official hire date)?
During the pre-employee phase, you would have received two separate automated emails from the workday system to your personal email address that was provided to Employee Services.
- The first email would have contained:
- The second email would have contained:
- After clicking on the workday website link, there will be two options on the screen to log in. Pre-Employees (an employee that is logging into workday before their official hire date) will use the Native Workday Login button on the home page.
- Upon the first login, you would have been prompted to set a few challenge response questions
- These workday challenge questions are temporary and are only used in the event that you forget your password during the pre-employee phase of the hiring process.
- Do not confuse these with your onboarding password recovery questions that you set in Step 1: Complete onboarding network account steps
You'll use the username and password combination and the Native Workday Login button on the home page to log into workday to upload all the documents necessary for Employee Services and the hiring process. You will continue to use this username and password combination and option to login into workday until your hire date.
How to log into workday as an employee (on or after your official hire date)
On your hire date or after your hire date your workday username, your workday password, and the button that you click to log in on the home page all change. Read on below for more details.
- You will use the Lynn Account option on the Workday Login Page https://wd5.myworkday.com/lynn/login.htmld
- You will use your Lynn email address as the username. i.e. jdoe@lynn.edu
- You will use the password that you set in Step 1 Complete onboarding network account steps
Return to Top
Step 4: Helpful information for the most common resources
Lynn University Knowledge Base

Return to Top
Office 365 FAQs

Return to Top
Lynn University Services Center FAQs

Return to Top
Zoom

Return to Top
Remote Working Resources
Return to Top
Additional resources available to Lynn University Employees and how to access/use them
Mango Languages
Grammarly
- Grammarly is an online writing assistance tool offered by the Lynn Library
- Please perform the following steps below to log in to Grammarly…
Adobe Creative Cloud
- Adobe Creative Cloud is a suite of applications for multi-media content creation.
- If you need access for business purposes, please contact your supervisor and have them initiate a request for you to be granted access to Adobe Creative Cloud.
Perkspot
- Perkspot is an online discount program for Lynn employees.
- Please perform the following steps to log in to Perkspot
Onthehub
- Onthehub offers free and discounted software to Lynn Employees.
- Please perform the following steps to log in to Onthehub
- Navigate to this link https://lynn.onthehub.com
- Select the software you would like and follow the instructions to purchase and download.
Flipster
- Flipster allows Lynn University students, staff and faculty access to the Lynn Library digital magazine subscription service. The service allows access from any computer, laptop, or mobile device, as long as it is connected to the Internet.
- Please perform the following steps to log in to Flipster
- Navigate to this link https://lynn.onecampus.com/task/all/flipsterlynn
- Log in using your network email address and password.
Global Protect Virtual Private Network (VPN)
Return to Top
| You may also want to use visual panels to communicate related information, tips or things users need to be aware of. |
Related articles
Related articles appear here based on the labels you select. Click to edit the macro and add or change labels.

Welcome to Lynn! Verbiage TBD by employee services


