Your Worker Profile page displays employee information about you, including your office location, phone number, and compensation. Note that the visibility of sensitive information is controlled by individual users' security profiles.
To access your Worker Profile page, click your Profile icon > View Profile.
...
![]()
...
Note: All instructions in this job aid start from the Worker Profile page.
Add or Change Your Contact Information
- Click the Contact tab on the left. The Contact subtab is selected.
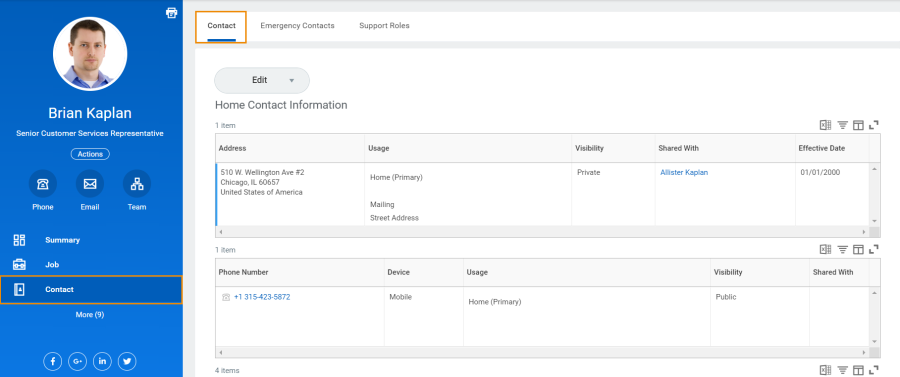
- Click Edit and select Change My Home Contact Information to change your personal contact information. Within each section, click the Edit icon
 to change existing information or click Add to add new information. You can also click within a field to edit.
 - Click Submit and Done to save your changes.
Add or Change Emergency Contacts
- Click the Contact tab.
- Click the Emergency Contacts subtab.
- Click Edit. Enter or modify your emergency contacts.
- Click Submit and Done to save your changes.
Modify Your Personal Information
- Click the Personal tab. The Personal Information subtab is selected.
- Click Edit. Enter or modify your personal information.
- Click Submit and Done to save your changes.
View Your Identity Paperwork
- Click the Personal tab.
- Click the IDs subtab. You cannot make changes to this information; you can only view it.
- Click the Documents subtab. Click the document links to download or view documents. Click Add to attach documents to your profile, Edit to make changes to documents, or Delete to remove them.
Change Your Legal Name
- Click your Related Actions
 button.
 - Select Personal Data > Change My Legal Name.
- Enter your new information, including any required information.
- Click Submit.
- Click To Do and Submit to submit proof of your name change or click Done to submit later.
Change Your Preferred Name
If you choose, your preferred name will display within Workday instead of your legal name.
- Click your Related Actions button.
- Select Personal Data > Change My Preferred Name.
- Clear the Use Legal Name as Preferred Name checkbox.
- Enter your new information.
- Click Submit and Done.
Add or Change Your Photo
...
Depending on your organization's configuration, you may need further approval before the change takes effect.
...
![]()
...
Note: The supported file formats depend on your organization's configuration. Typical formats include .png, .jpg, and .gif.
Add and View Your Social Networks
...
Delete a Social Network
- From your Related Actions, click Personal Data > Social Networks.
- Click Delete next to the appropriate network.
- Click Submit and Done.
View Transaction History
View your transaction history to see information such as benefit enrollment or personal data change dates.
- Click the Job tab.
- Click the Worker History subtab. Your business process history displays.
- Click View Worker History by Category. The data is organized into different tabs to make it easier for you to review your history.
Change a Business Title
...
Click Submit and Done.
...
![]()
...
Note: Depending on your organization's security, this may be routed to another department for approval.
Manage Worker Profile Summary Information
...
Upload My Experience
...
Click OK and Done.
...
![]()
...
Note: Workday initiates a background process to upload your Professional Profile data. After the process has completed, a notification displays.
On this Job Aid:
| Table of Contents |
|---|
Worker Profile Overview
Click your picture (or cloud icon) on the top right of the screen to access the profile page.

When you arrive at your Worker Profile, you’re presented a summary of your employment record:
- The Blue Ribbon Menu
- Your Manager
- Your Job Details
- Summary card (if you have other profiles like student, you can switch between your profiles in this area)

Blue Ribbon Menu
The Blue Ribbon Menu of the Worker Profile is a ‘one-stop-shop’ for your employment record. By default, you arrive on the ‘Summary’ tab. Each section offers information related to that subject, and many sections (e.g. Time Off, Contact, Personal, Performance, & Career) offer quick access to various actions (e.g. requesting time off, changing contact/personal information, and updating career history).
You can also use the Actions Button, just under your name, to view a list of all available actions you can take; more on this in the next section.

Ribbon Menu / Actions Button
The Actions Button is synonymous with ‘Additional Actions’ buttons that you will find next to business objects in Workday. Actions buttons allow you to see available actions for whatever object you’re viewing.
In the case of the Actions Button on your Worker Profile, the menu that appears provides you with available actions you can take on your own record.

Below is a limited list of the sections (most common) within Actions and a brief description of what they offer. Your records may look different depending on your position or access rights in Workday.
| Action | |
|---|---|
| Benefits | The Benefits section in the Actions menu allows you to request a Benefit Change, View Benefit information (current elections, beneficiaries, dependents, forms, history, etc). |
| Business Process | Primarily for managers, the Business Process section in the Actions menu allows you to manage delegation settings and view specific information related to business process actions for you as an employee. |
| Payroll | The Payroll section of the Actions menu allows you to manage your Tax Documents printing elections and view your tax documents, in general. |
| Personal Data | The Personal section of the Actions menu offers you access to View/Change your Contact Information, Emergency contacts, and Personal Information. You can also manage your self-identification items (Veteran Status and/or Disability), Complete an I-9 form (as needed), and/or Maintain Payment Elections/Direct Deposit. |
| Time and Absence | The Time and Leave section offers access to Enter Time (for hourly employees), Request Absence, or View Absence Balances. |
| Worker History | The Worker History section is your go-to place to find all actions that pertain to you as an employee. Clicking ‘View Worker History’ presents a table with Business Processes (such as your Hire), associated Dates, and statuses all in one place. |
...
Mobile
Change Your Contact Information for iPhone and iPad
From the Home page:
- Tap your Profile icon, then tap View Profile.
- Tap the Related Actions icon in the upper-right corner.
- Tap Personal Data > Change My Home Contact Information.
- Tap the Edit icon where you want to update the information and make your edits.
- Enter a comment at the bottom of the page and tap Submit. A confirmation page displays.
...
Update Your Profile Photo for iPhone and iPad
From your Worker Profile page:
...